Showing posts with label cricut. Show all posts

Tuesday, December 15, 2020

Little Holiday House Hop

 Hello everyone!! Welcome back to my blog!! Today, I'm participating in the Scrapbook.com's Handmade Little Holiday House Hop. 


Scrapbook.com has the cut files for these beautiful houses, which you can decorate any way you want!!  I cut them using my Cricut Explore and assembled the pieces. I colored the door red with my copic marker. I used die cuts using Sizzix Mini Holiday Greens die set to create that garland and wreath. I added stickles in cranberry and golden rod to the wreath, garland and as lights on top of the roof.


I decided to add a twist and show you that you can use this to store treats :) I made a base for this using white 110 lb card stock. I measured the size of the house and added 2" to the length and width. Then I scored at 1" from the 4 edges and slit the corner and adhered them to create the base.


Here's a pic with it closed:


Now, I added some lights to the house:


This is perfect for a Christmas display on the mantle, with some pine trees!


How do you like my house today? Please do let me know in the comments!! This is part of the Little Holiday Houses Hop. Please visit my Instagram post here for the details.

Thank you for stopping by! Have a great day.


Sunday, March 6, 2016

Congrats Bouquet

Hello everyone!! It's time for a new challenge here at the Unstampabelles. Our theme this month is 'Unlock Your Potential' with a twist to adding a key in your creation. You can create anything that shows unlocking someone's potential, congratulate someone who has done something great etc. The choice is yours. Here's what I've made to inspire you:


I used a beautiful paper that I had hoarded for years from the My Mind's Eye - Lost and Found - Blush, which I had got from Tracy's candy. I inked the edges with Pink Petunia chalk ink. I made some flowers which I cut out using a punch a a cut file on my Cricut. The swirly corner and the leaves were cut on my Cricut. I embossed the swirly corner with clear bark embossing powder from Stampendous.


The key is also cut on my Cricut. I designed the key on the Design Space using the circles and squares. I embossed it with Stampendous Clear Bark powder. The sentiment is hand written.

Do visit the Unstampabelles blog to see the lovely creations by the Susan and DT members. Susan has offered this lovely stencil and jewels as prize for the winner.


I hope you will give this a try and link up your creations.

Thanks for stopping by. I love reading your comments.

Submitting this to:


Sunday, September 27, 2015

Coffee Hugs

Hello everyone! How was your weekend? Hope you all had a great time. I made a card for the Fall Coffee Lovers Blog hop. This is my first time in the Coffee lovers blog hop.
Here's my card:


I used the cut file from Pretty Paper, Pretty Ribbon, which is a freebie this week. The pumpkin on the cup had eyes. It was cute. But I thought it wouldn't work well with the kind of card that I planned to do, so I removed that. I used Distress ink Ripe persimmon and Wild honey to color the pumpkin.


I used my Cricut Explore to cut a lot of construction paper and the mat lost its stickiness. The construction paper has lots of fibre which is difficult to remove from the mat. So whenever I tried to cut a design, the paper won't stick properly to the mat and while cutting, the paper will move. I was planning on changing the mat but was a little hesitant to do so. I was reading a post on one of the Cricut groups in FB where some people said they clean their mats with dish washing soap. I thought I'd give it a try before throwing the mat out. I'm glad I tried it!! I washed it twice with Dawn liquid soap and now it's sticking as good as new! So if any of you are facing this issue, you can give it a try. I mixed Dawn liquid soap with water and spread it on the mat. The FB post said to use a scrapper, but since I didn't have one I used a soft toothbrush. Once done, wash it with water and wipe with a clean towel or let it air dry. Mine became sticky after the first time, but not very good. So I did this one more time and it was perfect!


The sentiment is from STAMPlorations VIGNETTE: Art Deco Border Builders stamp set. I embossed it with white embossing powder. The Fall leaves are handmade. I used the cut file from SVG Cutting files, which is a freebie. I inked them with Distress ink Wild honey, Ripe persimmon and Hero Arts Dark Quartz and Red Royal.

Thanks for stopping by and hope you liked this card. Let me know what you think of this card and any suggestions as well!

Submitting this to:

Saturday, May 30, 2015

Anniversary Flowers

Hello everyone!! I'm here to share another anniversary card that I finished this week. It took me quite some time to make this card, mainly because I was lost as to how to make it :) Halfway through the card, I thought of scrapping it and doing it from start. But then I thought if adding few flowers and it made all the difference :)

Here is my card.


I cut out the lattice pattern on my Cricut with yellow paper. The cut file is from Bird's cards. I adhered it to the white card base.

I've been watching Emma Lou's (from Heartfelt Creation) video on how to shape a flower again and again. And each time I'm amazed at how beautifully she makes them. I was inspired by the video and thought of trying one of the flowers ( I really want to try all the flowers. I really need 48 hours in a day!! LOL!!) After few not very successful attempts and repeated viewing of the video, I made these flowers. The cut file is one of the free ones in Cricut Craft Room. The pollen and leaves cut files are from Bird's cards. I shaped the leaves as well.


The sentiment is hand written.


Do let me know your thoughts and comments.

Submitting this to:

Friday, December 26, 2014

Star Paper Lantern

Hello everyone!! I'm here to share a Star paper lantern that I made for Christmas. I'm a little late in posting it. In India it is a tradition to hang stars for Christmas. This is my first Christmas here in the US.

I was inspired by the Stars I saw in Debbie's blog. She has shared the SVG files for the basic star template in her blog for free.

Here is pic of the star with light at night.


I modified the SVG file to cut the triangle on each side. I have learnt a little bit on how to use the Cricut software. I used poster board for the frame and tissue paper for the triangular cut on each side.


I really love how it came out.


Hope you all had a good celebration for Christmas and wish you a very happy New Year :)
Do let me know your thoughts and comments. Thanks for visiting me today.

Submitting this to:

Tuesday, October 21, 2014

Congratulations

Hello everyone.. I'm here to share a card that I made today. I was able to spend some time on my craft table today, after almost a week.
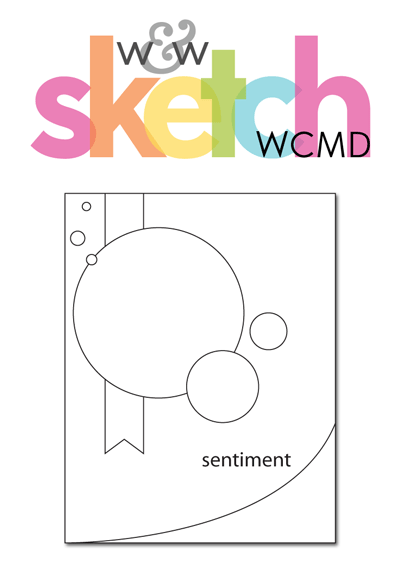
I saw this sketch and the color inspiration on Verve challenge blog which really inspired me.


Here's the card that I made using the sketch and the color inspiration.
 I cut the flowers on my Cricut using a cut file from the Cricut Design Space and the branches are from Bird's cards. The branches are actually grey. They appear a little darker in the photo. They have so many beautiful cut files for free. 

I added some pearls for flower center.

The sentiment and the banner are from Unity Stamp's Basically Said kit. I love this big font sentiments set. I stamped it using grey ink. I fuzzy cut it and popped it on foam tape. 


Hope you liked it. Please leave your thoughts and comments.

Submitting this to:


Saturday, October 11, 2014

Merry Christmas

Hello everyone!! I'm here to share with you a CAS Christmas card.

Here is the card!!


I used the stamps from Joanna Sheen's "Make A Wish" set. I colored it using sketch pens. For the center of the Poinsettia, I used glitter. I used some sequins from my stash.


I used glitter glue to create the shape in the bottom part. The sentiment "Merry Christmas" is cut from.... MY NEW CRICUT  EXPLORE :D :D!!! yay!! My dear husband was very kind and bought me one yesterday :D :D I haven't stopped smiling since then :D


Another pic of the card


Thanks for visiting. Please leave your thoughts and comments!!

Submitting this to: