Showing posts with label poinsettia. Show all posts

Tuesday, December 19, 2023

Coral Poinsettias

 Hello everyone! Welcome back to my blog. Today I have another Christmas card with - you guessed it right - poinsettias, this time in coral. 

I’m loving this Poinsettia Window die and stencil set from Hero Arts. I used inks from Memento and Brutus Monroe to color this. The sentiment die is from Hero Arts - Christmas Words fancy die set. I die cut it in gold glitter stock and added some stickles for the poinsettia centers. 

How do you like this card? Please do let me know. Thanks for stopping by. Have a great day!

Monday, December 18, 2023

Pink Poinsettia

 Hello everyone! Welcome back to my blog. Today I have another Christmas card with poinsettia. 


This is another card using the colors for Altenew Inspiration Challenge. I have used Altenew - Poinsettia, Fine Frames - Cover Plate die set, Berries and Branches die set and Fancy Peace die. I have been using these dies a lot this year. They have become some of my favorites!


How do you like this card ? Please do let me know in the comments. Thank you for stopping by. Have a great day!


Sunday, December 17, 2023

White Poinsettia

 Hello everyone! Welcome back to my blog. Today I have a Christmas card with a white poinsettia 😉


I stamped the poinsettia and berries branch from Altenew - Poinsettia and Berries stamp set and pine and pine cone from Altenew - Pine cone stamp set and colored them with Alcohol markers. The color scheme is from the current Altenew Inspiration Challenge. The sentiment is Altenew - Fancy Peace die. 


How do you like this card? Do let me know in the comments. Thanks for stopping by. Have a great day!

Saturday, December 16, 2023

Noel

 Hello everyone! Welcome back to my blog. Today I have a shaker Christmas card to share with you. 


Ok, by now you probably already know that I’m a big poinsettia fan ☺️ I loved this Hero Arts - Poinsettia window die and stencil set the moment I saw it during the release blog hop. But missed to buy it then. But soon, none of the stores had both the die and stencil in stock. Some stores had the die, some had the stencil. I waited for some time, but eventually bought them from 2 different stores ☺️ I just love the ease of creating a beautiful floral arrangement with a window - you can use it without the window too! I decided to make it a shaker window. I used inks from Brutus Monroe, Hero Arts and Memento. The sentiment is from Hero Arts - Christmas words fancy die set, which I die cut in a holographic red card stock. It was super fun and easy to make this card. 

Thanks for stopping by today. Have a great day!

Thursday, December 14, 2023

Poinsettia for Christmas

 Hello everyone! Welcome back to my blog. I have another Christmas card with a blue poinsettia today. 


I used the Altenew - Poinsettia die set and die cut the blue poinsettia. I die cut some branches for. The Altenew - Berries and Branches in 2 different color card stocks. For the sentiment, I die cut the Altenew- Fancy Peace die on gold. Die cutting has been my go to technique this year. I just love it. The colors for this card was inspired by the current Altenew Inspiration challenge


Thank you for stopping by! Have a great day!

Friday, December 8, 2023

Pink Poinsettia

 Hello everyone! Welcome back to my blog! Today I have a pink and purple Christmas card with pink poinsettia. 


I started by embossing a piece of purple cardstock with Altenew - Layered Snowflakes 3D embossing folder. I then die cut poinsettia using Altenew - Poinsettia on pink cardstock and inked it lightly with Mauve. I also die cut the Altenew - Fine Frames cover plate on white glitter paper. This was a bit thin paper, so I had trouble while adhering it down. I die cut some pine boughs using Elizabeth Craft Design dies. The sentiment is from Altenew - Poinsettia and Berries stamp set. The colors are from the Altenew Challenge


How do you like this card? Please do let me know in the comments. Thanks for stopping by. Have a great day. 


Monday, November 27, 2023

Purple Poinsettia

 Hello everyone! Welcome back to my blog. Today I have a Christmas card with Purple Poinsettia.


I used the layering poinsettia stamp from Altenew - Poinsettia and berries stamp set with inks from Hero Arts. I stamped the berries from that stamp set and also the one from Altenew - Shrub Rose stamp set and colored them with copics. For the background, I used the Altenew - Deck Planks 3D embossing folder on grey card stock. The sentiment is from the same set. I added a few gems as finishing touch. The colors are from the current Altenew Inspiration Challenge.


Monday, November 29, 2021

Merry Christmas

Hello everyone!! I'm on the Craftwell blog today, with a Christmas card idea that you could easily make multiples of - just in time for sending Christmas cards. 

If you are like me, you are frantically looking for Christmas card designs that you make and send out 20's or more in a week or 2 at the max - that includes addressing and sealing the envelope as well. You are in the right place! This is 1 such design that I was able to make 20's in 3 - 4 days, working only a few hours every night, since I work during the day and have small kids. I first die cut all the greenery pieces I needed for this card - I used the Tim Holtz Mini Holiday Greens die set. These were perfect size for my A2 card. Next on to the poinsettia - this is a multi-step process. I stamped the poinsettia outline stamps from the Poinsettia & Holly Clusters - these stamps stamp out a few at a time, so it saves time (same with the dies as well). I stamped them with dark red ink on red cardstock to save time on coloring. Using a stamping platform helped speed up the process. I die cut all the poinsettia layers then and shaped them all with my embossing tool and foam mat. Then I adhered the layers to make the individual poinsettias and added prills for the center. Now comes the sentiment. I die cut the layers I used for the sentiment panel. All the layers are from Heartfelt Creations - Royal Elegance die set. The touch of gold adds just the right amount of elegance needed for this otherwise simple and almost flat card. I heat embossed the sentiment from Sunny Studios with gold embossing powder. I used a stamping platform for this step too. I stamp the sentiment on a panel and sprinkle embossing powder - I do this until I have a bunch ready to be heated and then I heat them all at once. This saves some time too. Now, all that's left is assembling them. I used foam tape for the sentiment panel and for the other pieces, I used liquid glue in a fine tip bottle. That's it! This card required the extra stamp for postage, but it's worth it, don't you think?

How do you like my card today? Please do let me know in the comments below. Thank you for stopping by! Have a great day!

Monday, September 7, 2020

Elegant Christmas

Hello everyone!! I shared this card on the Scrapbookpal blog this weekend. I have made a elegant Christmas card to share with you today. It's September already, and I'm still trying to finalize my design for the Christmas card that I will send out to my family who are in different parts of the world and I need to mail out those cards before Thanksgiving! Whew! No pressure!


I've been a fan of Spellbinders - Amazing Paper Grace dies for a long time. The elegant look of those swirls and twirls never cease to amaze me. I decided to use one of my favorite card creator dies for this card. It's not a Christmas die, but I decided it would give an elegant look on the ivory card base that I have chosen. I die cut the Cascading Grace die on gold foil card stock. Now if this isn't elegant, I don't know what is!

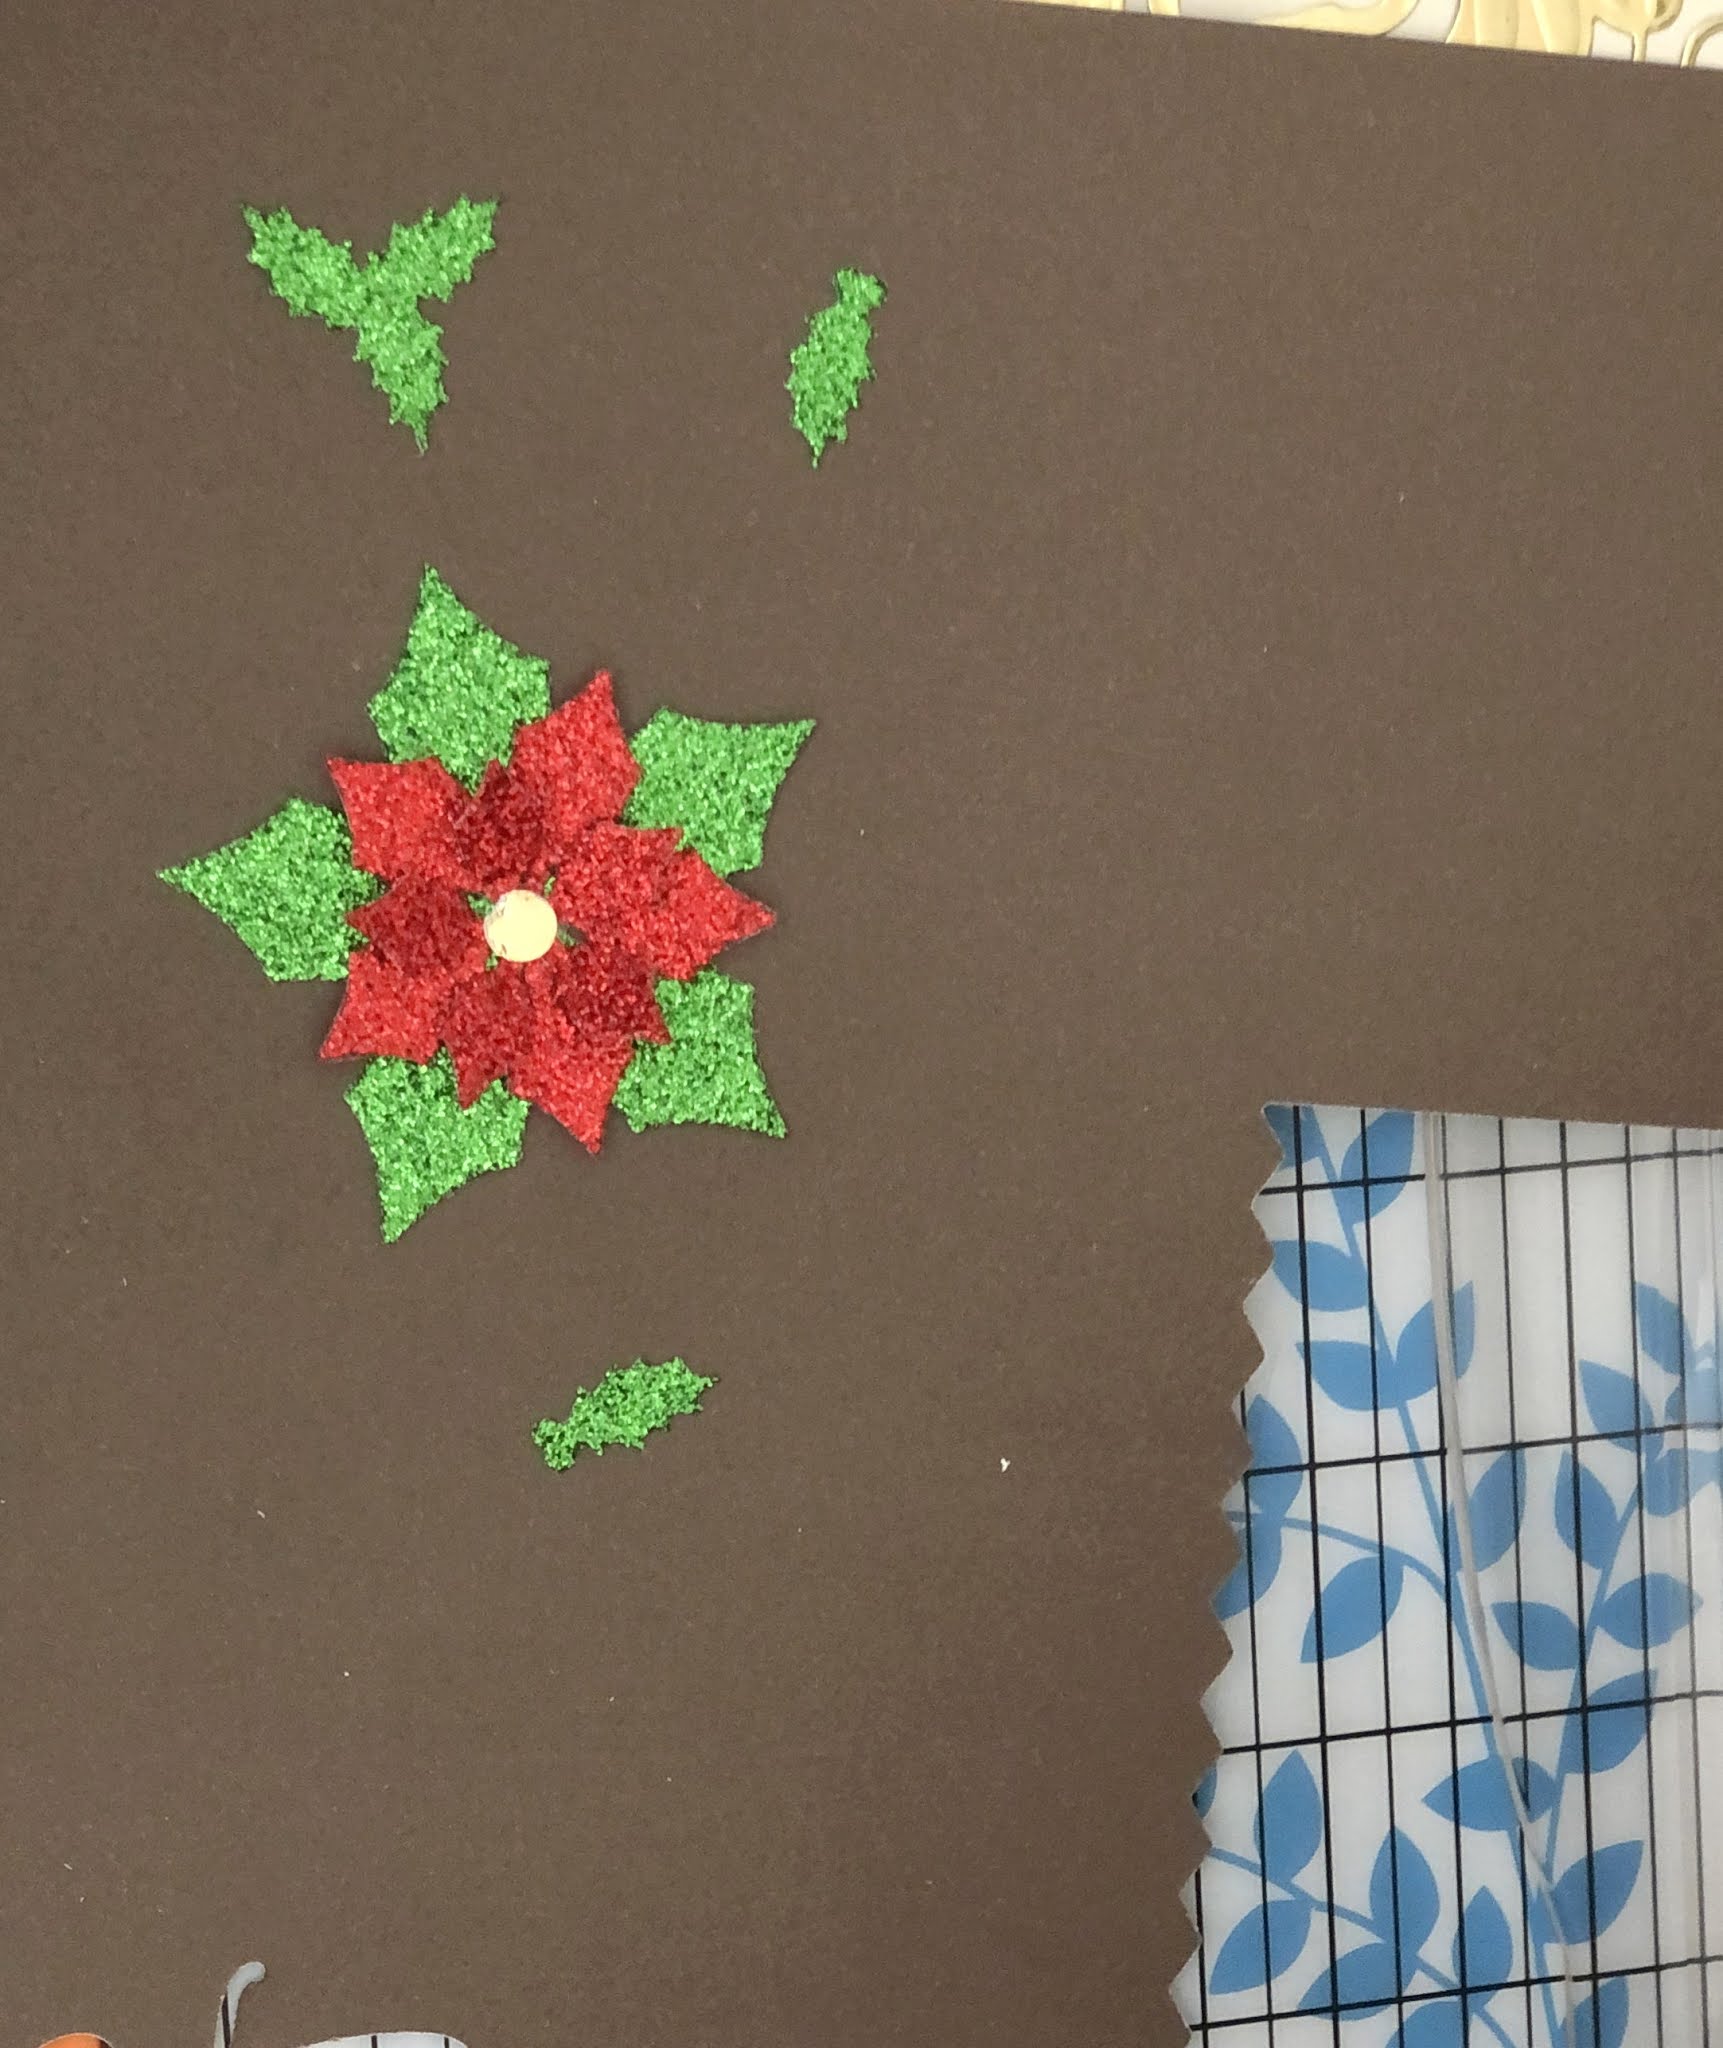
Next, let's get to the sparkling poinsettia on the left corner. I think all Christmas cards should have poinsettia - I'm a big fan of poinsettias! I love this Spellbinders Layered Poinsettia dies to make my paper poinsettias. For this card, I used the 3 smaller layers to make this smaller poinsettia. I die cut 2 layers on red glitterstock and 1 layer (the largest layer) on green glitterstock. I used liquid glue to adhere the layers together.

Now comes the sentiment - I decided to go with Spellbinders - Amazing Paper Grace again. I used the 'Merry Christmas' sentiment die from the Holly Jolly Christmas die set on the same gold foil card stock. I also used the tiny holly leaves dies from the same die set to cut a few green glitterstock hollies. 

Now comes the fun part - putting all of them together. I trimmed a 5" x 7" card base slightly, so that it measured 4 3/4" x 6 3/4". This looked better with the Cascading Grace die cut.

I adhered all the pieces using liquid glue with a fine tip. I added a few red gems to the holly leaves to represent a few berries and a single yellow gem on the center of the poinsettia. Here's a look at the completed card:

What do you think? I think this is pretty easy to make in multiples and elegant as well - do you agree? Please let me know your thoughts and comments!

Thank you for stopping by today. Have a great day!

Thursday, January 24, 2019

Poinsettia

Hello everyone!! After a long time, I'm posting a Christmas card that I made with a PowerPoppy image, today.


Most of you, who follow me for sometime might know that I love Marcella's floral images! This poinsettia (Poinsettia and Pomegranates Digital stamp) is no exception!! I loved coloring it with Copics. I made this card sometime back, but didn't get to share it then. I just adore the beauty of the curled leaves of the poinsettia!! The sentiment is from another PowerPoppy clear stamp set called Glistening Paperwhites, which I heat embossed with Gilded embossing powder from Brutus Monroe. I added thin strips of double sided adhesive on the sides of the card base and added gold foil. Then I adhered the poinsettia panel on to it.

How do you like this card? Please do let me know in the comments below. Thank you for stopping by! Have a great day!!

Submitting this to:

Tuesday, December 4, 2018

Color Crush - Joy!

Hello everyone!! Today on Brutus Monroe, we are blog hopping with our creations inspired by a cozy color theme!! Here's my card for today!!


I started by stamping the poinsettia from the Holiday Card Kit stamp set on a piece of white card stock with Sugar Cone ink for no-line coloring. I colored the image with Copics. Then I used the Triangles stencil to apply the Rock Candy ink on to background. Then I stamped the sentiment ‘Joy’ from the Merry & Bright stamp set with Locomotive surface ink. I matted this plane with a piece of Midnight cardstock and added it on to an A2 cardbase.


How do you like my card today? Please do let me know. Don’t forget to hop along the team:

Heather
Daniel
Berina
Lauren
Jessica
Ashley

Thanks for stopping by. Have a great day!!

Supplies

Affiliate links are used
Holiday Card Kit Stamp Set

BM
Merry & Bright Stamp set

BM
Mini Surface Ink Pad Collection: Fall

BM

"Rock Candy" Mini Surface Ink Pad

BM

"Locomotive" Mini Surface Ink Pad

BM

"Sugar Cone" Surface Ink Cube

BM
Mixed Media Stencil - Triangles

BM
Copic SKETCH Marker - Cool Gray No. 1 - C1

SPAL
Copic SKETCH Marker - Cool Gray No. 3 - C3

SPAL
Copic SKETCH Marker - Cool Gray No. 5 - C5

SPAL
Copic SKETCH Marker - Cool Gray No. 7 - C7

SPAL
Copic SKETCH Marker - Cardinal - R59

SPAL
Copic SKETCH Marker - Coral - R35

SPAL
Copic SKETCH Marker - Peach - R32

SPAL
Not Your Mama's Cardstock - Heavyweight

BM
Alabaster 110lb - Premium Cardstock

BM
Card Stock
Card Stock

BM
Cabbage - Cardstock - 100lb - Cover

BM
Midnight-Cardstock-100lb-Cover

BM
Glue
Glue

BM
Squeaky Clean Stamp Cleaner

BM
Squeaky Clean Stamp Scrubber

BM
Acrylic Block
Acrylic Block

BM
EK Tools® Small Precision Scissors - 5 inches

BM
Embossing Heat Tool
Embossing Heat Tool

BM
Clear T Square
Clear T Square

BM
Fold and Score Tool
Fold and Score Tool

BM
Mini Ink Blending Tool Kit

BM
Mini Ink Blending Tool Replacement Foams - 20 Pieces

BM
3D White Foam Squares • 1/2 in

BM | TW
Thermoweb - Purple Tape

BM | TW
Sticky Tape Mini Runner™

BM | TW
Brutus Monroe - Foam Tape - 36 Yards - 108 Feet

BM