Hello everyone! I'm on Craftwell blog today, with a beautiful birthday card with orchids.

Please visit my blog post to see how I made it.
Thanks for stopping by. Have a great day!
Hello everyone! I'm on Craftwell blog today, with a beautiful birthday card with orchids.
Please visit my blog post to see how I made it.
Thanks for stopping by. Have a great day!
Hello everyone! I'm on the Craftwell blog, with a Christmas card - I know it's August, but I do like to get started on making a few different designs early and then decide on the one which I will be making for my family in India. Since this goes overseas, I like to mail them before Thanksgiving.
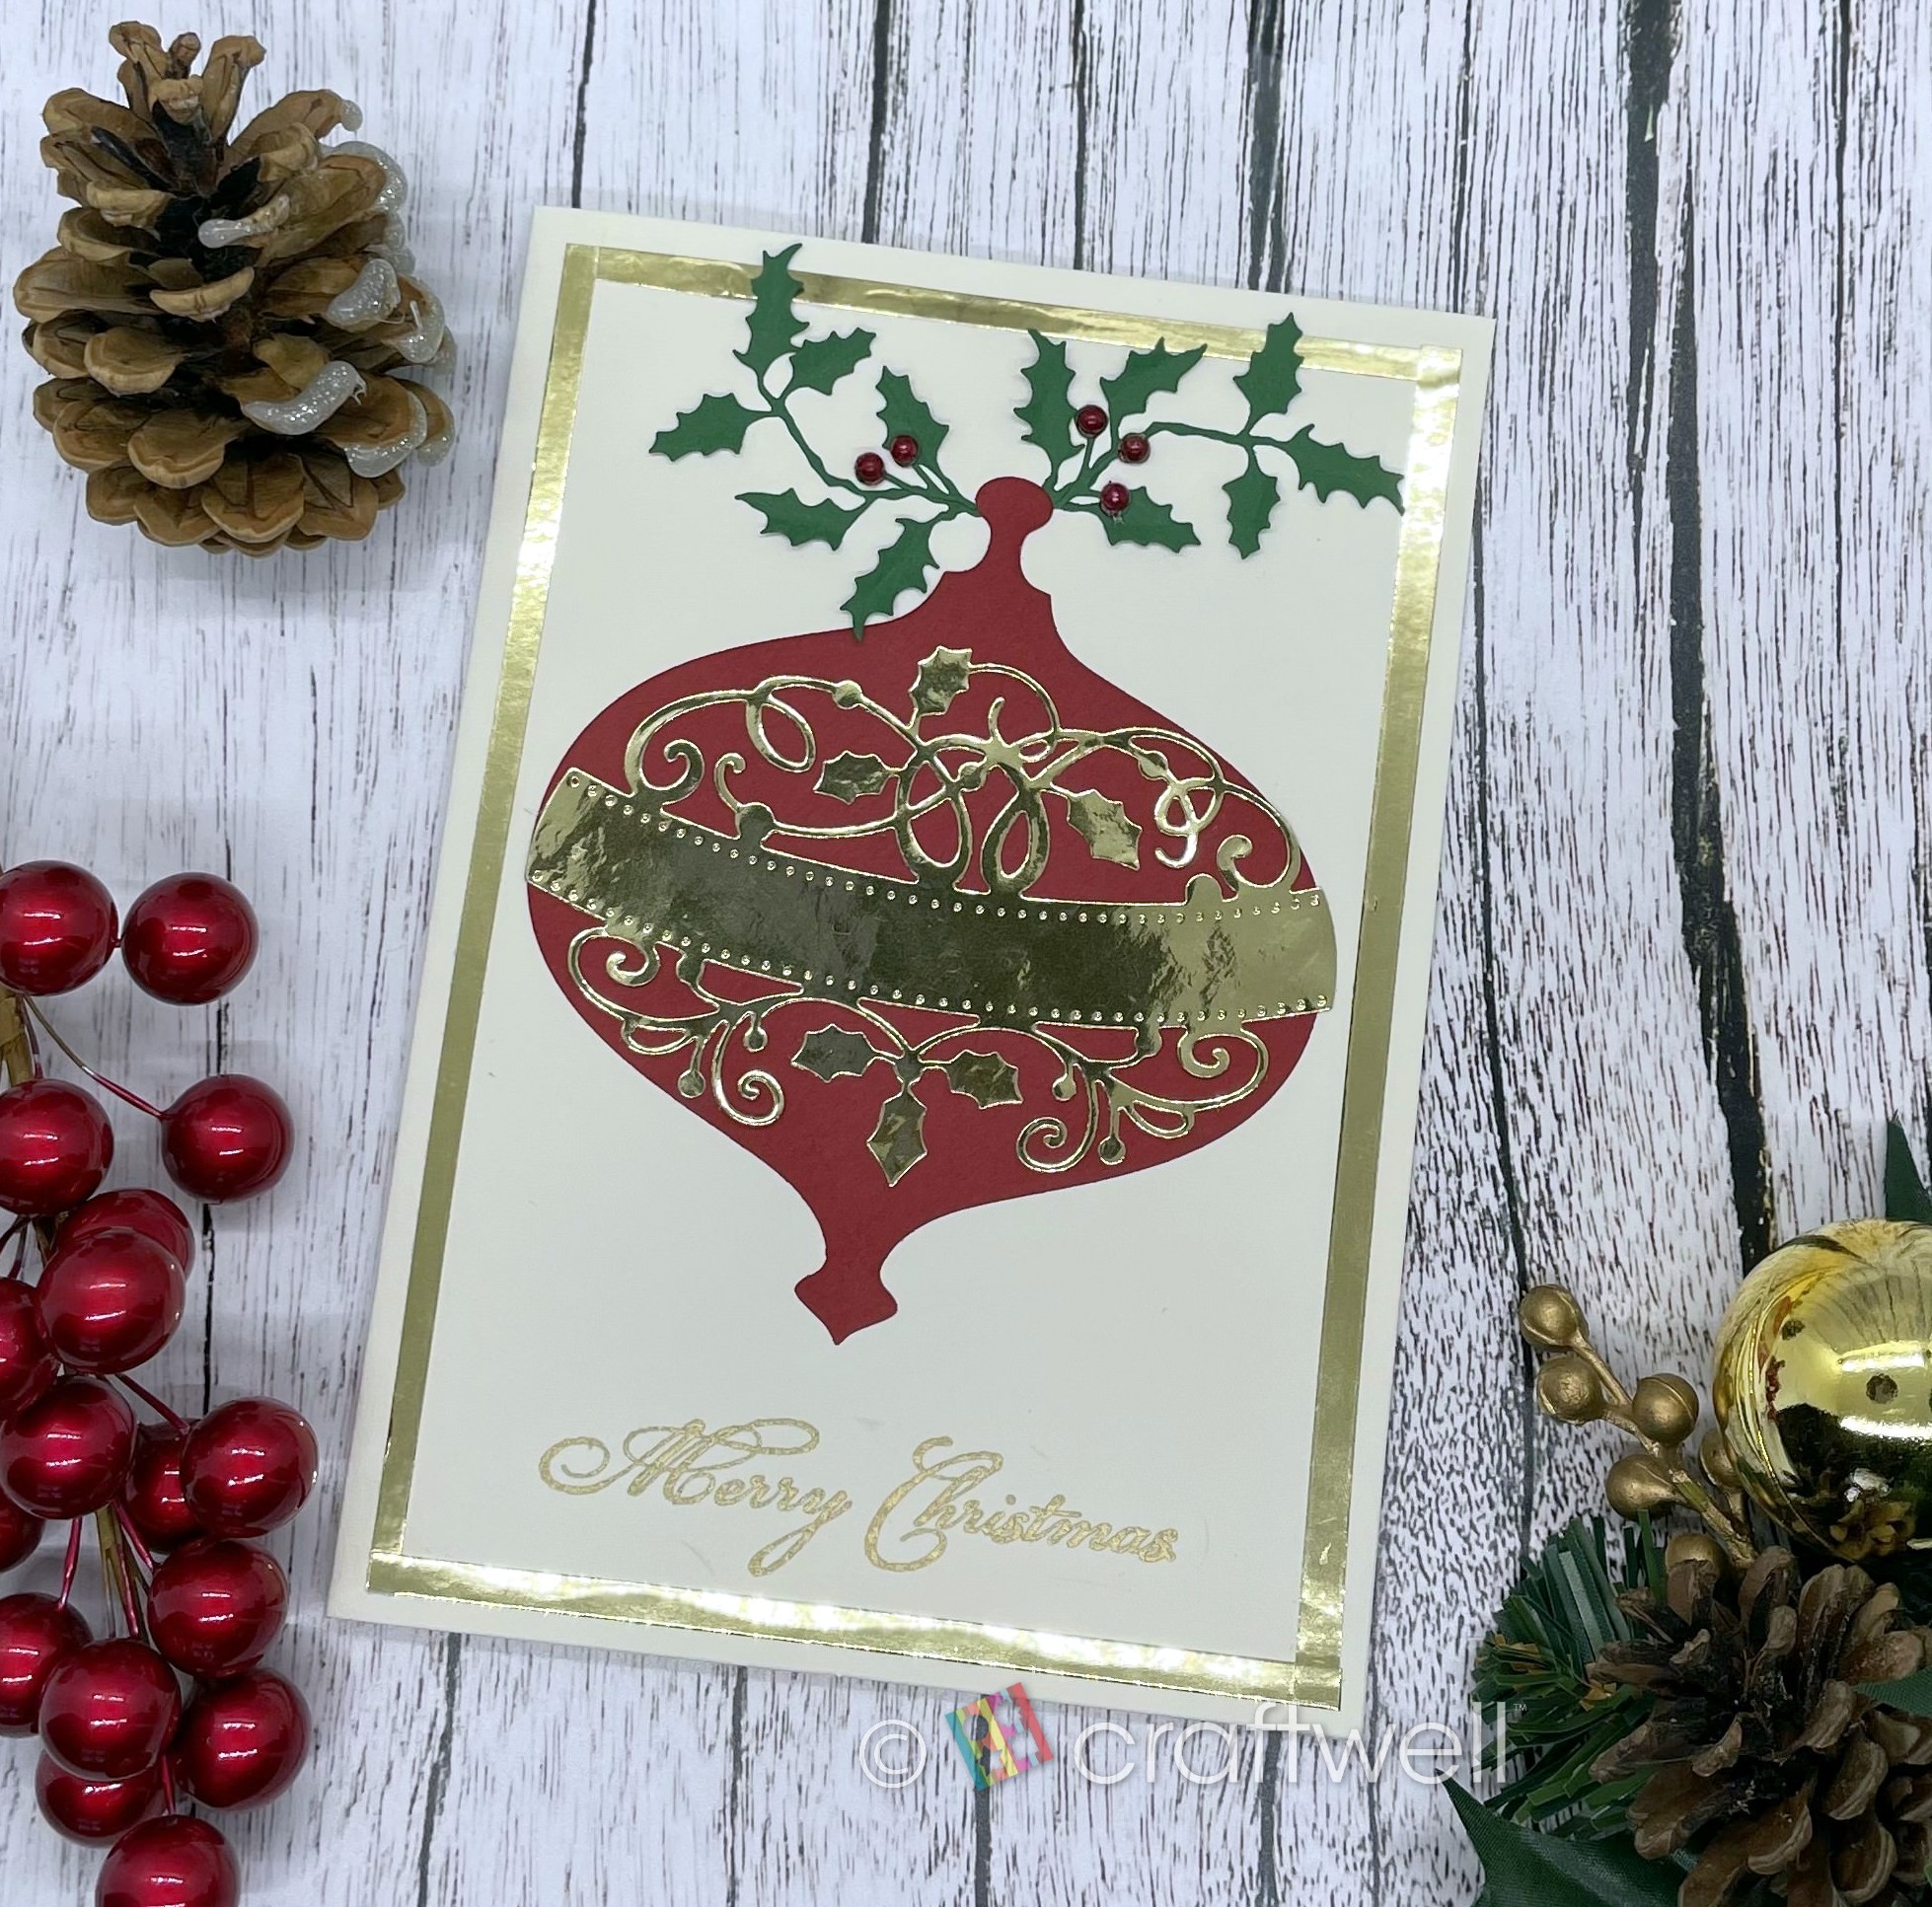
I used the Noel Ornament die set from Heartfelt Creations. I love the red and gold combo. I used ivory card base and layered gold and ivory card stock. To ground the ornament I added a holly bough, die cut with Sizzix Mini Holiday Greens die set and added a few red pearls as berries. For the sentiment, I used Divinity Designs Christmas Mini Set.
Thank you for stopping by. Have a great day!
Hello everyone!! I'm on the Craftwell blog today, with a Christmas card idea that you could easily make multiples of - just in time for sending Christmas cards.

If you are like me, you are frantically looking for Christmas card designs that you make and send out 20's or more in a week or 2 at the max - that includes addressing and sealing the envelope as well. You are in the right place! This is 1 such design that I was able to make 20's in 3 - 4 days, working only a few hours every night, since I work during the day and have small kids. I first die cut all the greenery pieces I needed for this card - I used the Tim Holtz Mini Holiday Greens die set. These were perfect size for my A2 card. Next on to the poinsettia - this is a multi-step process. I stamped the poinsettia outline stamps from the Poinsettia & Holly Clusters - these stamps stamp out a few at a time, so it saves time (same with the dies as well). I stamped them with dark red ink on red cardstock to save time on coloring. Using a stamping platform helped speed up the process. I die cut all the poinsettia layers then and shaped them all with my embossing tool and foam mat. Then I adhered the layers to make the individual poinsettias and added prills for the center. Now comes the sentiment. I die cut the layers I used for the sentiment panel. All the layers are from Heartfelt Creations - Royal Elegance die set. The touch of gold adds just the right amount of elegance needed for this otherwise simple and almost flat card. I heat embossed the sentiment from Sunny Studios with gold embossing powder. I used a stamping platform for this step too. I stamp the sentiment on a panel and sprinkle embossing powder - I do this until I have a bunch ready to be heated and then I heat them all at once. This saves some time too. Now, all that's left is assembling them. I used foam tape for the sentiment panel and for the other pieces, I used liquid glue in a fine tip bottle. That's it! This card required the extra stamp for postage, but it's worth it, don't you think?
How do you like my card today? Please do let me know in the comments below. Thank you for stopping by! Have a great day!
Hello everyone!! Welcome back! I'm on the Craftwell blog today, with the banner I made for my daughter's birthday. My daughter wanted a Tinkerbell themed birthday party this year and I decided on making a tree stump cake for her, with Tinkerbell and fairy figurines. I wanted to make a banner that would go well with the cake design. I couldn't find much inspiration on tree stump banners online. So I decided to make my own version. Warning: This is a picture heavy post!


Here's a look at the entire setup with the cake and the cupcakes.

A closer look at the tree stump cake with some cake moss.

Let me know how I did! My daughter absolutely loved the decorations and the cake! Thanks for stopping by today! Have a great day.
Hello everyone!! I'm on the Scrapbookpal blog today. I have a cute baby card - I made this gender neutral, but you can make it in pink or blue too. Last year and this year, lots of our friends (and us) had/will have babies. I've been making welcome baby cards and thank you cards a lot more than other years. I made this card for one of our friends who had her baby shower recently.

I love making cards that have different than normal folds, but I don't make them as often as I'd like to. I want the baby cards to be really special, so I try to make them a special fold. This is a side step crib and dresser card.

First I took a 100# card stock and cut it to 7" x 10". I then cut and scored the card to make it in to a side step card.

This is the measurements I used.

Next I cut the pieces for the dresser. I used grey card stock for the furniture. I cut a piece of size 4" x 5" and cut off a tiny piece at the bottom to make it look like it had 2 legs. I then cut 3 pieces of size 1" x 3 1/2" for the drawers.

On to the crib part now. The crib is made of tiny strips of card stock. I cut 2 strips of length 4" for the vertical frame, 2 strips of length 3" for the horizontal frame and 5 strips of length 2 3/4" for the railings. It might look a little daunting, but trust me, it's so easy. Having a grid underneath helps in adhering the strips uniformly. I adhered the railings to 1 of the horizontal frame. Then I adhered the other horizontal frame to the vertical pieces of the frame. Then adhere them all together. Doing it in this order was easier for me.

Now back to the dresser. I sponged some Memento London Fog ink to the edges of the drawers. The card stock color was very close to this color, so adding the ink gave a slight definition to the drawers.

Now comes the fun part - putting all together. I used foam tape to adhere the drawers on to the dresser. For the rest, I used glue. I added a drawer below the crib and added pearls for all the drawer pulls.
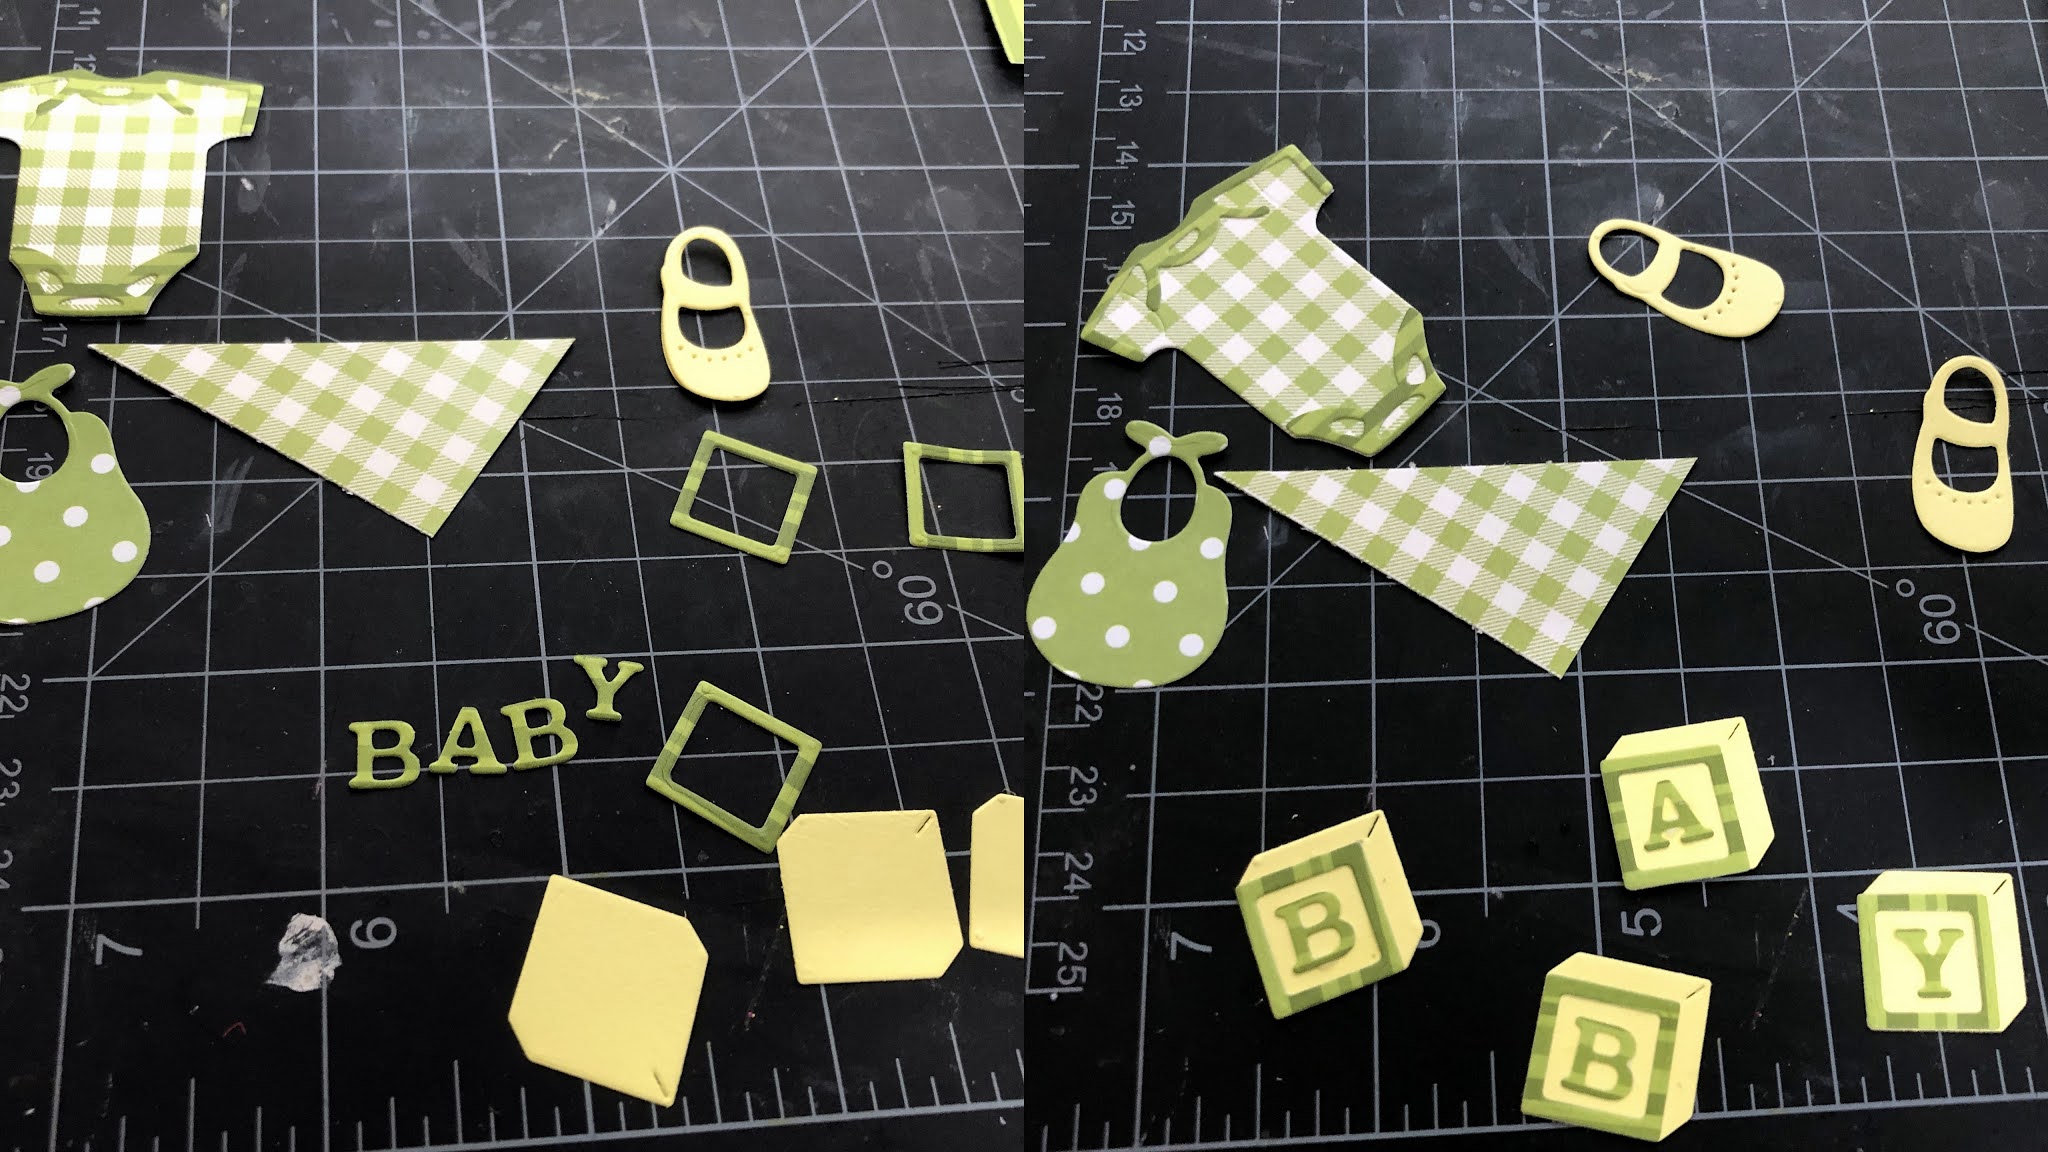
The cute stuff - I die cut all the pieces for the cute baby onesies, bib and blocks using the Sizzix Thinlits Dies - New Baby #2 by Lisa Jones die set on green pattern paper and yellow card stock. I cut a triangle out of green pattern paper to make the blanket. I assembled the pieces and adhered them together to make the baby embellishments.

The onesie deserves a hanger I think. So I used a paper clip to make the hanger. I adhered the hanger to the back of the onesie. There's something about onesies on hangers!!

Here's the fully embellished card! How cute is that!!
What do you think? I loved how this had turned out. The recipient and the others in the baby shower loved it. Please let me know your thoughts and comments!
Thank you for stopping by today. Have a great day!
Hello everyone!! I'm on the Craftwell blog today, with a simple thank you card.

I used the Sizzix Hot Air Balloon Die on pattern papers from Brutus Monroe to make the hot air. This die has become one of my favorites - it can be used for a lot of different types of cards. I've made quite a few with it so far. The sentiment is from a stamp set by Verve stamps. I adhered a piece of grey card stock on an A2 card base and matted it with a white card stock. I adhered the hot air balloon next and stamped the sentiment. Love my Cut N Boss for all the die cutting!
How do you like my card today? Please do let me know. Thank you for stopping by. Have a great day.
Hello everyone!! I'm on the Craftwell blog today, with a cute little treat basket, just in time for Christmas treats.


Now, I added some Nuvo drops bottles and Stickles bottles to show you the size of the basket. Now, this is a basket I would love to receive ;)


How did you like this basket today? Please do let me know in the comments below. Thank you for stopping by. Have a great Festive Season and a wonderful New Year!
Hello everyone!! Welcome back to my blog!! Today, I'm participating in the Scrapbook.com's Handmade Little Holiday House Hop.

Scrapbook.com has the cut files for these beautiful houses, which you can decorate any way you want!! I cut them using my Cricut Explore and assembled the pieces. I colored the door red with my copic marker. I used die cuts using Sizzix Mini Holiday Greens die set to create that garland and wreath. I added stickles in cranberry and golden rod to the wreath, garland and as lights on top of the roof.

I decided to add a twist and show you that you can use this to store treats :) I made a base for this using white 110 lb card stock. I measured the size of the house and added 2" to the length and width. Then I scored at 1" from the 4 edges and slit the corner and adhered them to create the base.

Here's a pic with it closed:

Now, I added some lights to the house:

This is perfect for a Christmas display on the mantle, with some pine trees!

How do you like my house today? Please do let me know in the comments!! This is part of the Little Holiday Houses Hop. Please visit my Instagram post here for the details.
Thank you for stopping by! Have a great day.
Hello everyone!! I'm on the Craftwell blog today, with a light-up card. Believe it or not, this is my first light-up card and certainly won't be my last :)

I made this for my Dad's birthday. I started by making the card base. I took an A2 card base and adhered a light blue cardstock panel on to it. I folded the top of the card base in to half, to make the easel. I die cut the hot air balloon using the Sizzix Hot Air Balloon die, on card stock and vellum, using my Cut N Boss. I slightly colored the vellum with Brutus Monroe inks. I sandwiched the lights in between the cardstock and the vellum balloons and adhered it there and then placed the yellow pieces on the balloon. I die cut a few clouds using the die from the same die set. I adhered the switch part of the light behind one of the clouds. I die cut a banner and wrote 'Happy Birthday' since I couldn't find a stamp that would fit in it. I die cut another banner using another stamp set and wrote 'Dear Appa' - Appa is how I call him and it means Dad in our language Tamil. I adhered this banner with foam tape, on the inside of the card and it will serve as the 'stopper' for the easel. Here's a pic of it with the lights on:

And here's one with it flat, ready for the envelope:

How do you like my card today? Please do let me know. Thank you for stopping by. Have a great day.


