Showing posts with label Heartfelt Creations. Show all posts

Sunday, January 14, 2024

Lily of the Valley

 Hello everyone! Welcome back to my blog. Today I have an easel card with 3D flowers. 

I used the Spellbinders - Susan’s Garden - Lili of the Valley die set for making the flowers and foliage. It was pretty easy to make and I love making 3D flowers. I die cut the oval window with Tutti Designs dies. The heart flourish on the right is a dies from Heartfelt Creations. The sentiment die is from Creative Expressions - Belated Birthday Wishes, which I die cut multiple times and snipped off the belated. Here’s a pic when it’s closed. 

What do you think? Do let me know. Thanks for stopping by. Have a great day!

Submitting this to:

Friday, December 2, 2022

Golden Ornament

 I'm on the Craftwell blog today with this elegant Christmas card. 

Please do visit my blog post here to see how I made this card. This card is so elegant and it's easy for making multiples as well.

Have you started making your Christmas cards yet? Do let me know! Thanks for stopping by today. Have a great day!


Tuesday, October 11, 2022

Fall Themed Keepsake Box

 Hello everyone! I'm on the Craftwell blog today with this beautiful floral box. I thought this would be perfect with the current season.


Please do visit my post here to learn how I made it.

Thanks for stopping by today. Have a great day!


Monday, August 8, 2022

Red Christmas Ornament

Hello everyone! I'm on the Craftwell blog, with a Christmas card - I know it's August, but I do like to get started on making a few different designs early and then decide on the one which I will be making for my family in India. Since this goes overseas, I like to mail them before Thanksgiving.

I used the Noel Ornament die set from Heartfelt Creations. I love the red and gold combo. I used ivory card base and layered gold and ivory card stock. To ground the ornament I added a holly bough, die cut with Sizzix Mini Holiday Greens die set and added a few red pearls as berries. For the sentiment, I used Divinity Designs Christmas Mini Set.

Thank you for stopping by. Have a great day!

Wednesday, May 11, 2022

Calla Lilies

Hello everyone! I'm on the Craftwell blog today with a elegant floral card. 

I love these Calla Lilies from Heartfelt Creations. I have had them for quite some time now. I stamped and die cut the flowers and leaves and colored them with inks. Then I used my flower shaping tools to give them some definition. I colored few Q tips with yellow ink for the center part of the calla lilies. To assemble them, I used hot glue gun. I also stamped and die cut some fillers from Heartfelt Creations - Tulip Vase & Fillers. For the card base, I used a 5x7 Ivory card base. I die cut few frames from the Heartfelt Creations - Royal Elegance Frames on gold card stock. The sentiment is from Just Rite stamps. This is one of my favorite sets for sentiments, mainly because of the font. I also die cut a few designs from Heartfelt Creations - Swirly Accent Spray and added them to the card.

How do you like my card today? Please do let me know. Thank you for stopping by. Have a great day!

Monday, November 29, 2021

Merry Christmas

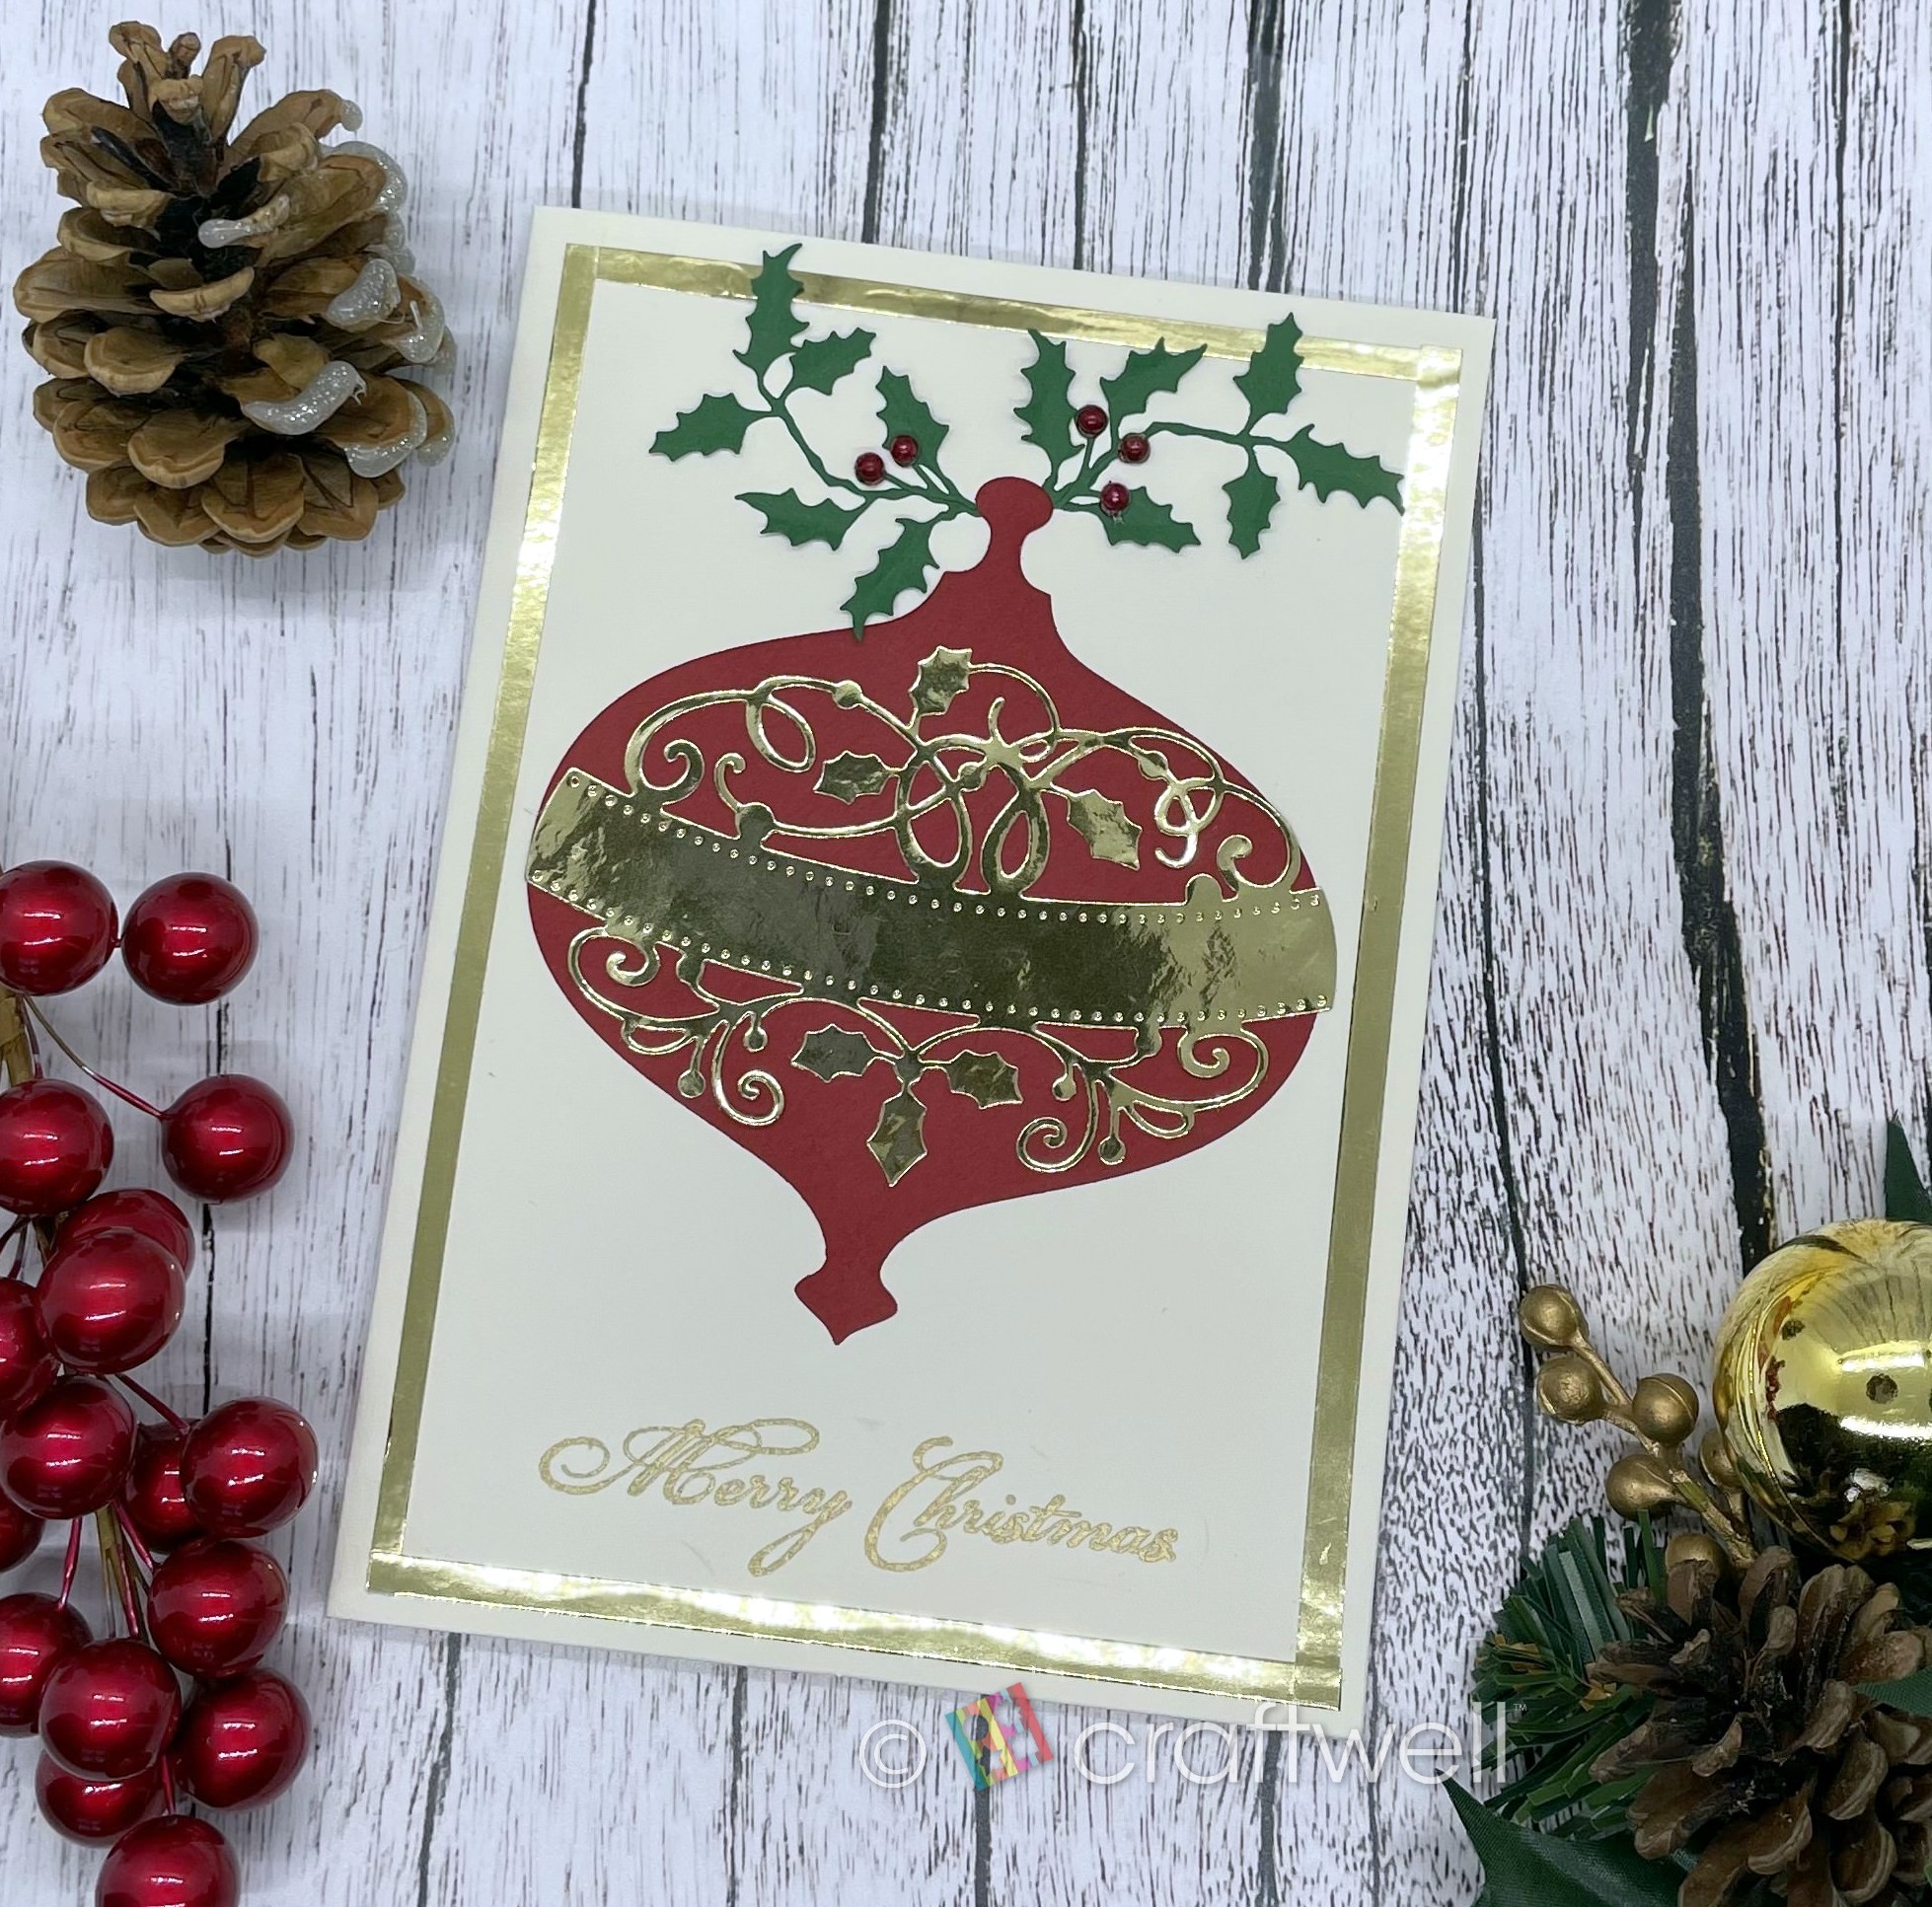
Hello everyone!! I'm on the Craftwell blog today, with a Christmas card idea that you could easily make multiples of - just in time for sending Christmas cards. 

If you are like me, you are frantically looking for Christmas card designs that you make and send out 20's or more in a week or 2 at the max - that includes addressing and sealing the envelope as well. You are in the right place! This is 1 such design that I was able to make 20's in 3 - 4 days, working only a few hours every night, since I work during the day and have small kids. I first die cut all the greenery pieces I needed for this card - I used the Tim Holtz Mini Holiday Greens die set. These were perfect size for my A2 card. Next on to the poinsettia - this is a multi-step process. I stamped the poinsettia outline stamps from the Poinsettia & Holly Clusters - these stamps stamp out a few at a time, so it saves time (same with the dies as well). I stamped them with dark red ink on red cardstock to save time on coloring. Using a stamping platform helped speed up the process. I die cut all the poinsettia layers then and shaped them all with my embossing tool and foam mat. Then I adhered the layers to make the individual poinsettias and added prills for the center. Now comes the sentiment. I die cut the layers I used for the sentiment panel. All the layers are from Heartfelt Creations - Royal Elegance die set. The touch of gold adds just the right amount of elegance needed for this otherwise simple and almost flat card. I heat embossed the sentiment from Sunny Studios with gold embossing powder. I used a stamping platform for this step too. I stamp the sentiment on a panel and sprinkle embossing powder - I do this until I have a bunch ready to be heated and then I heat them all at once. This saves some time too. Now, all that's left is assembling them. I used foam tape for the sentiment panel and for the other pieces, I used liquid glue in a fine tip bottle. That's it! This card required the extra stamp for postage, but it's worth it, don't you think?

How do you like my card today? Please do let me know in the comments below. Thank you for stopping by! Have a great day!

Tuesday, April 20, 2021

Hello Daisies

 Hello everyone!! I'm on the Craftwell blog today with a lovely Spring card!

I used the Heartfelt Creations' Delicate Asters dies to create the delicate daisies and the leaves. For the elegant border, I used Delicate Border Basics, also from Heartfelt Creations. For the beautiful scripty hello, I used the Fancy Hello die from Altenew. I used my SNAP machine for all die cutting. After adhering all the flowers, leaves and sentiment, I added a few drops of Nuvo drops in clear.

How do you like my card today? Let me know in the comments. Thanks for stopping by. Have a great day!!

Submitting this to:

Monday, April 12, 2021

Birthday Roses

 Hello everyone!! I'm on the Craftwell blog today, sharing this beautiful birthday card with 3D flowers:


As you might already know, I'm a big fan of Heartfelt Creations flower dies. For these flowers and buds, I used the Tulip Time dies. This die set even has a die for the stalk of the flower. I shaped the flowers with flower shaping tools and used hot glue gun to adhere the layers of the flowers and buds. It makes a difference. I cut a few leaves using the leaf die from the Delicate Asters die set. The beautiful decorative piece on the right, in pink and white is cut using the Decorative Medallion die set, also from HFC. I was so surprised when I was able to cut such a delicate intricate piece in 1 pass on my SNAP machine!! Just amazing!! I arranged the flowers the way I wanted them to be and added some white pollen to the spray. The sentiment is from Inspired By Stamping - Summer Bouquet.


How do you like this card? Please do let me know in the comments. Thanks for stopping by. Have a great day!!

Submitting this to:

Wednesday, March 24, 2021

Lace & Daffodils

 Hello everyone!! I'm sharing this beautiful Spring card with daffodils and lace on the Craftwell blog today. 

I stamped the image from the Heartfelt Creations stamp set called Daffy Daffodils, colored it with copics and cut it out. I die cut the lace die from Altenew on the front panel of an A2 card base. I used the same die to cut a lace out of yellow card stock. I used it to mat the image panel. I also die cut the "Hello" using the Altenew Fancy Hello die on a black shimmer card stock and added it on to the card. I stamped the sentiment from Altenew Statement Flowers stamp set, cut it out and added it to the card. I added a few Nuvo drops in black color to accent it.

For the inside, I decided to add a piece of lace as well, to complement the card front. I die cut the same lace die in yellow card stock and added it on the inside.

I used the SNAP machine to die cut all the dies and I must tell you - I was able to die cut the intricate lace die in 1 pass. How amazing is that!! What do you think of this card? Please do let me know in the comments. Thank you for stopping by. Have a great day.

Submitting this to:

Monday, March 22, 2021

Hello Daffodils

 Hello everyone!! I'm here to share a beautiful Spring card with Daffodils.

I used the stamps from this old Heartfelt Creations stamp set called Daffy Daffodils. I the daffodils with Memento London Fog ink, colored them with Copics and die cut them with the coordinating dies from the set called Spring Medley die set. I die cut the basket using Simon Says Stamp Easter Basket die set on brown card stock. I arranged the flowers in the basket and adhered them with glue and foam squares. For the background, I used the Altenew Moroccan Mosaic cover die cut on white card stock and adhered it on to the card base. I cut out a frame with yellow card stock and adhered it to the background. For the sentiment, I die cut the hello using the Altenew Fancy Hello die on the same card stock used for the basket. I adhered the flower basket and the sentiment and added a some Nuvo drops in Yellow and Green.

How do you like my card today? Please do let me know in the comments. Thanks for stopping by. Have a great day.

Submitting this to:

Monday, March 8, 2021

Mother's Day Tulips

Hello everyone!! I'm on the Craftwell blog today, with a Spring Mother's Day card, with a vase full of Tulips.


I have this Heartfelt Creations - Tulip Vase & Fillers stamp and die set for quite some time and was planning to use it for a Spring card. I stamped the tulips, leaves and vase with Brutus Monroe inks for no-line coloring. I colored the images with Copics and die cut them using the matching dies on my SNAP machine. Then I colored the edges with Copic also - this takes only a few minutes, but makes a lot of difference. I arranged the flowers in the vase and adhered them. I die cut the frame using Royal Elegance Frames on kraft card stock to frame the vase. I decided to make a easel card, so I took an A2 card base and folded the front in half. I adhered the lower part of the frame to the lower part of the card base. For the stopper, I die cut another frame from the same die set and stamped the sentiment from the Verve stamp set. I adhered it with foam tape on the inside of the card.

How do you like this card? Please do let me know in the comments below. Thank you for stopping by. Have a great day.

Submitting this to:

Monday, January 18, 2021

Floral Bouquet

 Hello everyone!! Welcome back to my blog! I'm on the Craftwell blog today, with this card with a floral bouquet.


I love these Arianna Blooms from Heartfelt Creations. I used the die to cut out the flowers and stamens from card stock and shaped the layers with embossing tools. I die cut the Swirly Accent Spray die, also from Heartfelt Creations, on gold card stock. The leaves are cut using Spellbinders Fern die on green card stock. I used my Cut N Boss to die cut all of them. I adhered all these on a 5" x 7" ivory card base and adhered them down. 


Here's a look at the dimension. I added some pearls to the flowers. I didn't add a sentiment to the card on the outside of the card, as I wanted the focus to be on the flowers. 

What do you think? Please let me know. Thank you for stopping by today. Have a great day!


Friday, December 18, 2020

Christmas Treat Basket

Hello everyone!! I'm on the Craftwell blog today, with a cute little treat basket, just in time for Christmas treats.


I used the Divinity Designs Bountiful Basket die to die cut the basket out of kraft card stock. It was pretty easy to do. It fit on my snap machine and was a breeze to cut. I needed 2 pieces of each die cut, and it was pretty easy to assemble. I stamped and die cut the Heartfelt Creations Poinsettia and shaped it with embossing tools. I die cut the greens using the Sizzix Mini Holiday Greens die set. I adhered the poinsettia and the greens on the basket and added some Nuvo drops for some berries.

Now, I added some Nuvo drops bottles and Stickles bottles to show you the size of the basket. Now, this is a basket I would love to receive ;)


One more pic, before you leave :)


How did you like this basket today? Please do let me know in the comments below. Thank you for stopping by. Have a great Festive Season and a wonderful New Year!


Saturday, October 31, 2015

Made With Love

Hello everyone!! I recently bought some goodies from Create and Craft. You might have seen the embossing powders and the Inkadinkado stamps in my post this week here. I also bought a Heartfelt Creations stamp - The Heartthrob set. I also won the blog candy at Simon Says Stamp and I got a stamp set among other goodies :)


I stamped the Heartfelt Creations - Heartthrob stamp with black ink and colored it with my markers. I cut out 3 circles from different part of the image - This was inspired by the Power Poppy Stamps Challenge.


I used grey card base and used a white layer on it. I stamped the sentiment 'The best things in life are made with love' from Simon Says Stamp - Labelled with Love stamp set. I used Studio G grey ink for that.


I used silver sheer ribbon to make a triple bow and adhered it on the white layer with a strip of the ribbon. I used a comb to help me with the bow.


I used Hero Arts Silver ink to color a panel of white cardstock and adhered the circle cutouts of the image on to it. I then layered it on top of the white panel. I love the colors in this card.

Thanks for stopping by. Do leave your thoughts and comments. I enjoy reading them. Thanks for all the lovely comments on my GIU posts. Made my day!! And do visit my blog tomorrow. There are a creations waiting for you!

Submitting this to: